Insinyur PS

Rental PS2 bisa diantar 20000 /12 jam Jl. Ciruas-Walantaka, belakang station kereta walantaka, ...

Bali : Simply the World's Best Island

As probably the most famous island in Indonesia, Bali blends spectacular mountain scenery and beautiful beaches with warm and friendly people...

Nih, Cara Kerja All Wheel Drive Sepeda Motor Dari Christini Technology

Sepeda motor berpenggerk roda belakang, sudah biasa. Semua motor memang begitu. Tapi kalau berpenggerak 2 roda, atau semua rodanya bisa berputar...

Tunas Pelangi Terbit

Team Sepakbolanya anak-anak Tegalsari...

Piaggio dan Vespa Laris Manis di PRJ, Delivery Antri Sampai Oktober

T Piaggio Indonesia (PI) sudah kewalahan menerima pesanan. Totalnya ada 550 unit terjual sejak pertama kali PRJ...

Tampilkan postingan dengan label tips and trick. Tampilkan semua postingan

Minggu, 17 Agustus 2014

Diskless boot Windows 7 step by step.

This article is for CCBoot v2.1 only. For CCBoot v3.0, please refer to the video - "How to Diskless Boot Windows 7 with CCBoot v3.0" on Youtube.

iSCSI boot technology can be used to diskless boot Windows 7 for computers without local hard disk (in this article we call them client PC), so it's also known as diskless boot. As a Windows based iSCSI boot software, CCBoot is compatible with windows 7 lan boot, and support install windows 7 over network. Win XP and Vista. The brief process of diskless boot Window 7 with CCBoot is as bellow:
  1. Client PC iSCSI boot over network and broadcast DHCP request.
  2. CCBoot handles the DHCP requests and allocates IP address for the client PC.
  3. Client PC get IP addresses and then download Win 7 system image via TFTP from CCBoot server.
  4. Client PC iSCSI boot Win 7 over network.
To iSCSI boot Win 7 with CCBoot, we have 3 stpes to do.
  1. Install and Initialize iSCSI Boot Server with CCBoot

    iSCSI Boot Server Installation

    Download iSCSI boot software - CCBoot server installation package from - http://www.ccboot.com/download.htm.
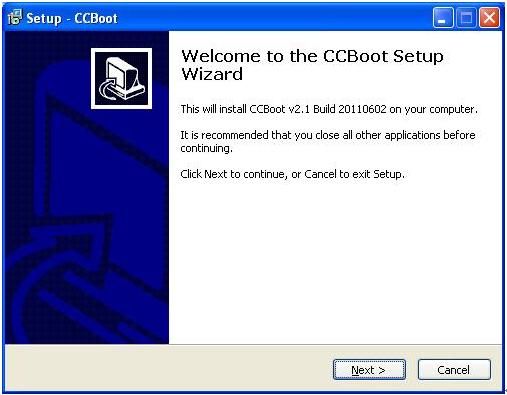
    Launch ccbootsetup.exe on the server and keep press the next button to the end.

    Figure 1
    CCBoot uses the following ports - 67 (DHCP), 69 (TFTP), 3260 (iSCSI), 1000 (Image Upload), 8001 (Service Control). Please open these ports on the server firewall to make sure client PC can diskless boot successfully. Since CCBoot v2.1, you also need to open port 66. V2.1 uses port 66 as DHCP backup.
    Note: To make sure client PCs can diskless boot well, please shut down the other DHCP services on the LAN especially the DHCP service in the router.

    Launch CCBoot and you will get the main interface as bellow:
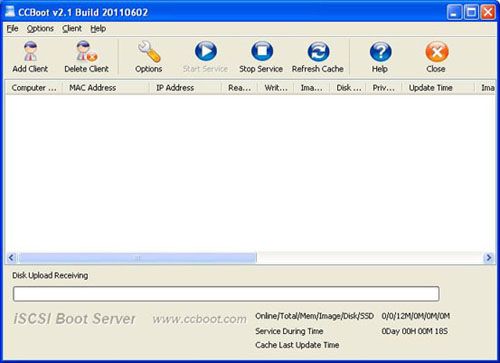
    Figure 2

    iSCSI Boot Server Initialization

    Demo Environment
    Server IP: 192.168.1.10
    Gateway: 192.168.1.1
    DNS Address: 192.168.1.1
    IP Mask: 255.255.255.0
    DHCP Range: 192.168.1.101-192.168.1.254

    Open the iSCSI boot software - CCBoot, "Options"->"Options Wizard" and configure step by step as bellow:

    Figure 3
    You need to select the correct local IP address as "DHCP Server IP". Press "Scan DHCP" to check if there are other DHCP services on the LAN. If yes, shut them down so that client PC can get IP address from CCBoot DHCP and then diskless boot Windows 7
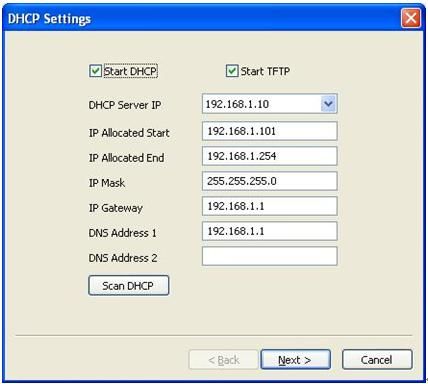
    Figure 4
    Set "Server IP Address". Normally, it’s the same as "DHCP Server IP".
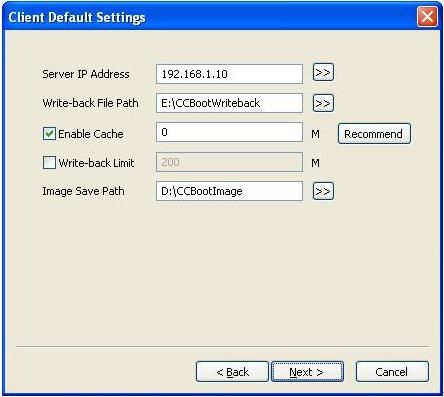
    Set "Write-back File Path" and "Image Save Path" as you want.

    "Write-back File Path" is used to store the diskless booted clients’ write-back data. You’d better use a big volume hard disk as "Write-back File Path". This disk should be formatted as NTFS and 32K bytes per cluster.
    "Image Save Path" is used to store the iSCSI boot images. This disk should be also formatted as NTFS and 32K bytes per cluster. You’d better use a fast speed hard disk as "Image Save Path". For example, use an SAS hard disk.

    Figure 5
    Keep default values in "Server Cache Settings".
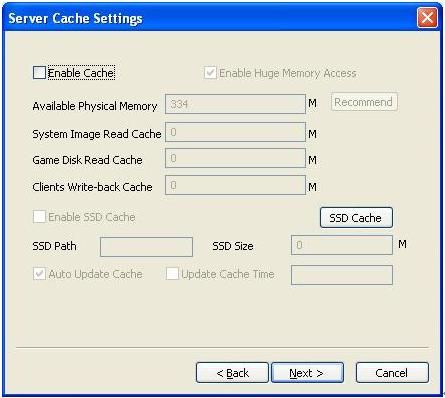
    Figure 6
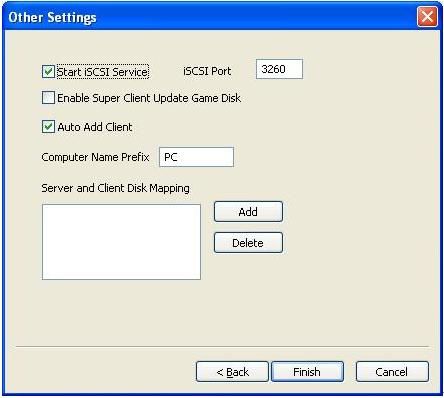
    Keep default values in "Other Settings". Press the "Finish" button and confirm the popup dialog box.
  2. Upload Win7 System Image for iSCSI Booting

    To diskless boot Win 7, we need to create a system image for Win7 and save it on the CCBoot server.
    1. Choose one client PC as master PC used for uploading iSCSI boot image. Attach a hard disk on the PC.
    2. Delete all partitions first. Allocate a small MBR partition about 40G size and leave the rest unallocated. Format the 40G partition with NTFS. Install Window 7 into this partition.
    3. Install only NIC driver, chips driver and other low level drivers on this master PC.
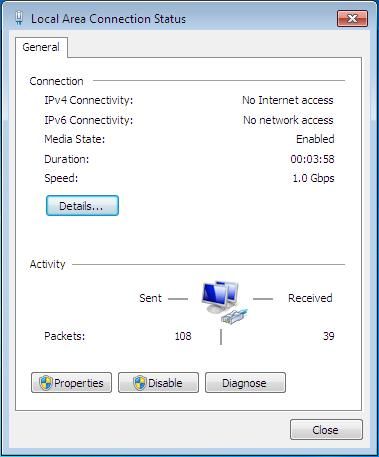
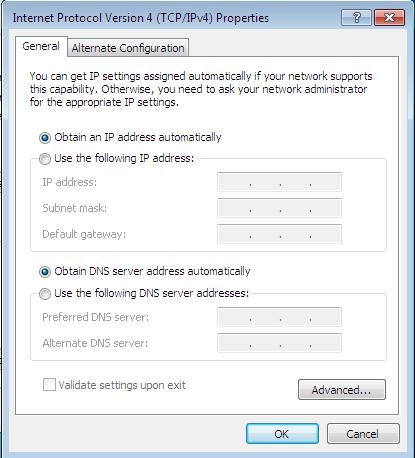
    4. Open the local area connection network properties and configure as bellow:

      Figure 7
      Click "Properties".

      Figure 8
      Select "Internet Protocol (TCP/IP)" and click "Properties".
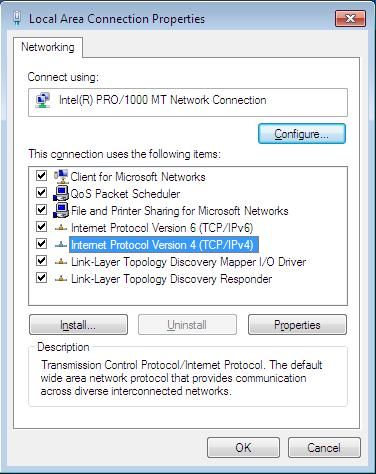
      Figure 9
      Select "Obtain an IP address automatically" and "Obtain DNS server address automatically", then click "OK" to save.
    5. On the CCBoot server you will find a client in the client list (Figure 10) that was added by CCBoot automatically when the client PC got IP address from the CCBoot DHCP service.
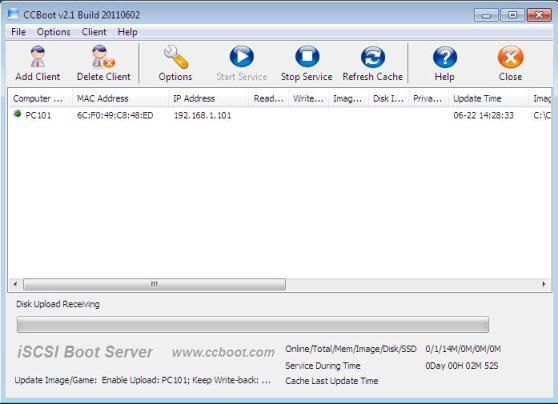
      Figure 10
    6. Double click the client to edit and check both "Enable Upload Image" and "Keep Write-back File" (Figure 11), when press "save" button it will ask you "Are you sure to delete write-back file?" Just press "No".
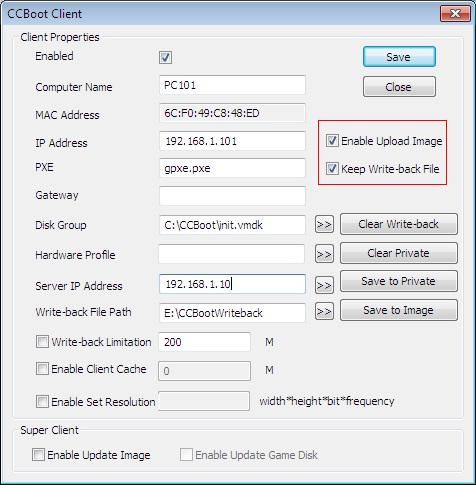
      Figure 11
    7. Download CCBoot client installation package from: http://www.ccboot.com/download.htm. Launch ccbootsetupclient.exe and keep press the next button to the end. Then launch CCBoot client and you will see the main interface as bellow (Figure 12).
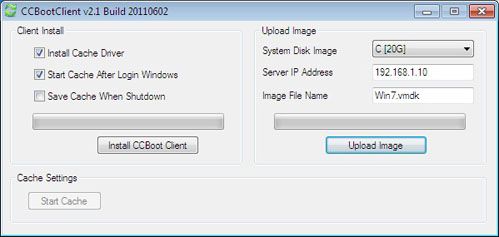
      Figure 12
    8. Press the "Install CCBoot Client" button. After finished, it will require reboot system. Reboot the client PC.
    9. After reboot, launch CCBootClient again, input the correct "Server IP address", it should be the IP address of the PC on which CCBoot server has been located. Input the image file name as you wish in the "Image File Name". Press the "Upload Image" button to upload the image to the CCBoot server. Then CCBoot will create an iSCSI boot image in the server "Image Save Path".

      Note: CCBoot supports two types of image file format. It supports ".VMDK" image file format if you are using Windows 2003 as CCBoot server system. It will support both ".VMDK" and ".VHD" image file format if you are using Window 7 or Windows 2008. As you can see in Figure 12, the image file format depends on the file extension you have set for the "Image File Name". For example, if you set "Win7.vmdk" as the "Image File Name", it means you will use ".VMDK" image file format, while if you set "Win7.vhd", it means you will use ".VHD" image file format.

  3. iSCSI Boot Windows 7 on LAN

    1. On CCBoot server, double click PC101 (Figure 10) to open the master PC’s properties dialog box, uncheck "Enable Upload Image" and "Keep Write-back File".
    2. Remove the HDD from the master PC, set it firstly boot from LAN (or network, PXE rom, or some similar settings) in BIOS settings so that it will start diskless boot (Figure 13).
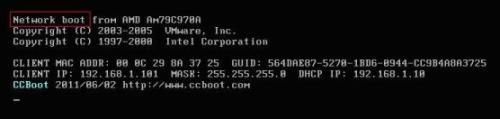
      Figure 13
    3. The first time diskless booting the master PC, you can modify its computer name (Figure 14).

      Figure 14
      Set the computer name as you wish then press enter key to boot it (Figure 15).
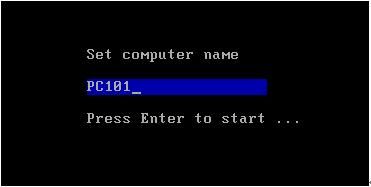
      Figure 15
      Note: the first time you diskless boot Windows 7, you will get a startup list just like has not shut down computer normally. That’s just because we uploaded the iSCSI boot image during Win 7 is running. Bellow is how to prevent from this situation for future booting.
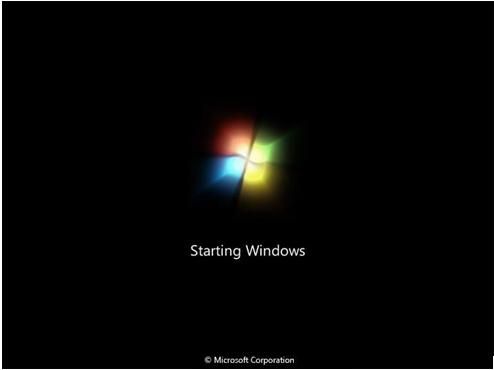
      1) Select "Start Windows 7 Normally" to boot.
      2) When this client PC diskless boot OK, shut it down. On the CCBoot server, press "Save to Image" in this client's properties.
      Now, clients can diskless boot Windows 7 from this image normally.

    4. On CCBoot server, "Options" -> "Settings" -> "Default Client Settings" -> "Disk Group" -> press the ">>" button, select "Win7.vmdk" as the default boot image in "System Image Selection" section.
    5. Do the same as Step 2 and Step 3 for other diskless PCs with the same specifications as the master PC to diskless boot Win7 for them.

  4. Additional Instruction

    • If the image you have uploaded from the master PC can be used to iSCSI boot Windows 7 for all the other client PCs, please install other drivers (display, sound etc), Windows updates, and various application level softwares to the image by update image.
    • If you want to iSCSI boot Windows 7 with a single image for client computers with different hardware specifications, you need to implement PnP, please refer to this article for more details - how to create a single image for all specifications
Source: http://www.ccboot.com/

CCBOOT by Kafi: Cara instal 1 hardisk untuk beberapa komputer dg OS apa saja.

Booting Windows apa saja dengan LAN. Beberapa Komputer hanya dengan 1 harddisk yg berisi OS.

Kelemahannya hanya terbatas 5 komputer User Client. Kalo lebih harus beli license. Cocok untuk warnet kecil2an yg gak mau ribet ttg securitynya atau kantor yg IT nya males untuk dikit2 repair karena user. Sudah dicoba dgn 5 komputer Client dgn spek yg sama. Gak ada masalah. Kalau mau dgn 5 komputer Client yg beda2 ada caranya lg.

System ini bekerja dengan cara 1 komputer server dan beberapa client. Server yg dimaksud bukan berarti windows server. Tetapi hanya sebagai pusat data untuk menyimpan booting image dengan minim os windows xp. Untuk client sebenarnya bisa untuk semua jenis windows. Tapi sudah coba berkali2 tetap yg berhasil cuma win xp.
Jangan lupa, semua komputernya harus support LAN booting room.

PERALATAN:

Yang diperlukan :
1. Minim 2 Komputer aktif. 1 buat server program(komputer ini harus mempunyai spec yg agak bagus dari yg lainnya diutamakan RAM nya). 1 nya lg client untuk install WINDOWS pertama kali(Soalnya kalo pake Virtual PC gw yg gak bisa caranya).

2. Sediakan Partition khusus di harddisk untuk menyimpan file2 yg digunakan untuk booting image. Syukur2 kalau ada harddisk khusus.

3. Jaringan LAN aktif.

4. Program CCBoot serverCCBoot Client dan Microsoft iSCSI boot client

Setelah Disiapkan yg diatas, sekarang kita mulai. Ini untuk 5 client komputer dgn spek yg sama.

1. Disarankan Install fresh windows XP. yg akan digunakan untuk BOOT IMAGE dari komputer client. Create partition tidak usah terlalu besar. Yg penting cukup untuk install. 10Gb jg boleh. Kalau mau diinstal semua program yg dipakai juga bisa.

Harddisk ini nanti akan dilepas dari komputer client dan bisa digunakan untuk komputer server sebagai penyimpan data Boot Image.

2. Setelah selesai install semua termasuk driver-driver nya, pastikan settingan LAN untuk IP address dan DNS server address di client automatically.
Spoiler untuk LAN SETTING:


Tambahan, untuk yg sudah menggunakan modem speedy dan terdapat DHCP server, matikan terlebih dahulu.

3. Install "Microsoft iSCSI boot client" dengan default setting dan kemudian install "CCBoot Client" sampai muncul window baru dgn judul CCbootClient.
Spoiler untuk CCBOOTCLIENT:


Kemudian klik Install CCBoot Client Tunggu sampai selesai install tetapi jangan di restart dulu. Biarkan begitu saja.

4. Kita ke komputer server. Kalau menggunakan Modem ADSL Speedy default IP modem 192.168.1.1 maka IP LAN Komputer Server disetting 192.168.1.2
Spoiler untuk SETTING LAN SERVER:


Install "CCBoot Server" dengan setting default. Kemudian Running CCBoot.
Spoiler untuk CCBOOT SERVER:


klik OPTION
a. DHCP Server IP di isi IP komputer server.
b. IP Allocated Start di isi mulai IP setelah IP komputer server.
c. IP Allocated End di isi Akhir dari IP yg dimau.
d. IP Mask di isi mask net dari IP komputer server.
e. IP Gateway di isi dgn IP modem ADSL.
f. DNS Address 1 di isi dgn IP modem ADSL.
Spoiler untuk CONTOH CCBOOT SERVER OPTION:


Kemudian ke TAB Client Default Setting.
a. Image Server IP di isi IP komputer server.
b. Game Server IP di isi IP komputer server.
c. Write-back File Path di isi dengan folder dimana kapasitas harddisk yg masih banyak. Fungsinya untuk menyimpan file2 yg dijalankan client.
d. Enable Client Cache pilih RECOMMEND pilih 2G saja.
e. Image Save Path di isi sama dengan folder untuk Write-back File Path
f. Disk Group Kosongkan terlebih dahulu.
Spoiler untuk CONTOH CCBOOT SERVER OPTION:


Setelah selesai klik OK.

5. Kembali ke komputer client. Restar komputer client sekarang. Ganti settingan booting yg pertama ke LAN yg kedua ke harddisk. Biarkan booting selesai sampai masuk ke windows. IP dari Komputer client sudah masuk ke Komputer Server.
Spoiler untuk CCBOOT SERVER:


klik 2 kali pada komputer client itu untuk menampilkan settingannya.
Berikan centang pada Enable Upload Image
Spoiler untuk SETTINGAN CLIENT:


6. Jalankan program CCBootClient pada komputer client.
Isi Server IP Address dengan IP komputer server.
Kemudian klik Upload Image dan tunggu sampai selesai.
INGAT SETTINGAN CCBOOT pada KOMPUTER SERVER harus ENABLE IMAGE UPLOAD

7. Setelah selesai proses UPLOAD, matikan komputer Client. Cabut harddisk. Buang !!!!!(hehehehheheeee.... bercanda).

8. Kembali lg ke Komputer Server, Klik OPTION kemudian ke TAB Client Default Setting Isi Disk Group dengan file hasil upload dari komputer client. kemudian klik Aplly All Clients.
Spoiler untuk CLIENT DEFAULT SETTING:


Setelah klik OK, klik 2 kali pada client yg ada pada list CCBoot. Hilangkan centang pada Enable Upload Image. kemudian klik SAVE.

9. Agar komputer client bisa dihidupkan dari komputer server, setting BIOS pada komputer client WAKE ON LAN. Maka komputer client bisa dihidupkan dari CCBoot Sever dengan cara klik kanan Pilih WAKE ON LAN.

10. Untuk 4 client yg lainnya, cukup dengan setting BOOTING LAN FIRST.

 Source: http://akbarmukahfi.blogspot.com/2013/05/cara-instal-1-hardisk-untuk-beberapa.html

Senin, 16 Desember 2013

Cara Terbaru Mengatasi IDM Yang di Block atau Fake Serial Number 2013

Cara mengatasi dan menghilangkan notifikasi atau peringatan fake serial number IDM yang selalu muncul terus menerus itu sebenarnya cukup mudah dilakukan. Kita hanya perlu me-rename atau mengganti nama sebuah file yang ada di directory tempat kita menginstal IDM tersebut, ikuti langkah langkahnya dibawah ini:

  • Langkah awal buka Windows Explorer, kemudian cari dimana tempat kita menginstal IDM.
Cara Terbaru Mengatasi IDM Yang di Block atau Fake Serial Number 2013
  • Setelah itu cari file yang bernama IDMGrHlp.exe seperti gambar diatas, klik kanan pada file tersebut kemudian klik rename. Selanjutnya ganti nama file tersebut, terserah mau sobat ganti nama apasaja,
Cara Terbaru Mengatasi IDM Yang di Block atau Fake Serial Number 2013
  • Contoh pada file tersebut saya rename menjadi nama SemauGue.exe heheheheheee...
Sampai pada tahap ini notifikasi atau peringatan yang selalu muncul terus menerus bahwa IDM Fake Serial Number tersebut telah hilang, namun setelah kita melakukan reboot atau restart komputer atau laptop akan muncul sebuah peringatan yang menyebutkan bahwa IDM tidak dapat menemukan file IDMGrHlp.exe yang tadi telah kita rename atau rubah namanya.
Cara Terbaru Mengatasi IDM Yang di Block atau Fake Serial Number 2013
Untuk mengakali hal tersebut cukup dengan membuat file duplikasi IDMGrHlp.exe dari file idmBroker.exe, berikut cara membuat duplikasi file tersebut:
  • Langkah awal hampir sama dengan cara yang diatas yaitu, buka Windows Explorer, kemudian cari dimana tempat kita menginstal IDM. Setelah itu cari file yang bernama idmBroker.exe seperti gambar dibawah ini,
Cara Terbaru Mengatasi IDM Yang di Block atau Fake Serial Number 2013
  • Selanjutnya copy file tersebut ke desktop, kemudian rename file idmBroker yang tadi telah kita copy ke desktop dengan nama IDMGrHlp, jangan dahulu ditutup windows explorernya
  • Setelah kita rename file yang ada di desktop tersebut menjadi IDMGrHlp, kemudian copy dan paste kedalam directory tempat kita menginstal IDM.
  • Taraaaaaaaa,,Selesai deh, mudah-mudahan notifikasi atau peringatan IDM fake serial number yang muncul terus menerus tersebut tidak akan muncul kembali....... (Belum Teruji) :p
Source: http://www.inforizal.com/2013/11/mengatasi.idm.block.html

Rabu, 27 Februari 2013

SMB LAN setup picture


Selasa, 26 Februari 2013

Ps2 sistem LAN


Tutorial ini sengaja ane copas supaya ane gampang kalo mau nyarinya lagi..... Masih belum mengerti sih... masih dalam proses memahami.....  JADI BELUM TERUJI YESS

 bahan yg dibutuhkan


Spoiler untuk bahan:

- PS2 slim / gendut --> khusus gendut pake Network Adapter yg Ori ya..
- free mc boot/ CD/DVD Ulaunch --> buat loading OPEN LOADER
- OPENLOADER v0.8 --> buat main gameny
- kabel lan type cross --> buat nyambung PC-PS2
pake yg PC to PC aja biar gampang
- PC -->> buat naruh gameny
PC yg ane pake P4 1.8, RAM 512, lan card REALTEK
loading speed lebih cepat daripada pake usb


setelah bahanny ada semua skr setting PC
Spoiler untuk setting PC:

ane pake win xp

- buat dulu koneksi lokal lan baru, bagi yg udah ada langsung aja ke properties TCP/IP
- setelah selesai buat koneksi baru skr setting TCP/IP
IP Address : 192.168.0.2
Subnet Mask : 255.255.255.0
- jangan lupa untuk mematikan firewall

- skr buat folder baru dengan nama PS2SMB, ntar gameny di taruh disini
- trus klik kanan folder PS2SMB, pilih properties->sharing->centang share this folder, ntar Share name akan kluar PS2SMB, centang juga yg Allow
- selesai buat folder, skr buat lagi folder di dalamny PS2SMB yaitu
CD -> buat naruh game format CD ukuran game < 1Gb
DVD -> buat naruh game format DVD ukuran game > 1Gb
THM -> buat naruh themes OPL
ART -> buat naruh gambar dari cover game
VMC -> buat naruh Virtual Memory Card
APPS -> buat naruh aplikasi lainny, misal: codebreaker
klo udah skr taruh iso game dengan format tulisan SLUS_xxx.xx.Judul game

contoh: C:\PS2SMB\DVD\SLUS_208.74.DRAGON BALL z SAGAS.iso -> klo game format DVD

oh iy judulny jgn panjang2, dibatasi sekitar 20 char, klo kepanjangan ga akan dibaca OPL


skr saatny setting PS2
Spoiler untuk setting PS2:

- extract OPL 0.8 ke flashdisk, lalu tancapkan ke ps2ny
- tancapkan mc dulu ke ps2ny, nanti buat save konfigurasi dari OPL
- jalankan cd ulaunch/free mcboot, pilih File Browser, Mass, OpenPS2Loader_0.8, sorot OPNPS2LD.ELF trus tekan O.
- setelah itu akan kluar OPL, di menu setting pilih network config
- setelah masuk network config akan muncul

-PS2-
IP: 192.168.0.10
Mask: 255.255.255.0
GW: 192.168.1.1

-PC-
IP: 192.168.0.2 -->> ganti supaya sama dengan ip dari komp agan
Port: 445
Share: PS2SMB
User: GUEST
Password:

- setelah setting kaya di atas skr kembali ke menu setting, pilih setting, cari ETH device start mode, lalu ganti on.
- kembali ke menu setting pilih save changes, abis save slesai pilih power off
- nyalakan lagi PS2ny, pilih OPL lg kaya langkah diatas..
klo sukses akan kluar list game yg ada di PC


kayany segitu dulu ya gan, sebenerny sih msh ada fitur dari OPL yg lain kaya Themes, Art ama Virtual Memory Card ..
tapi coba dulu yg ini klo udah bs baru ditambahin Themes, Art ama VMC..

maap klo kurang jelas soalny ga bs kasih gambar, klo ada gambar pasti lebih sipp..
smoga berhasil ya..

Sumber: http://www.indowebster.web.id/

Minggu, 10 Februari 2013

Software Untuk Memperbaiki Harddisk Yang Bad Sector

Software Untuk Memperbaiki Harddisk Yang Bad Sector | HDD Regenerator 1.71 Full Serial adalah sebuah software atau tools yang dapat kita manfaatkan untuk memperbaiki harddisk kamu yang kena bad sector. Nah, apa itu bad sector ? Bad Sector di hardisk secara umum ada 2 macam, yaitu mekanik/fisik dan software. Bad sector mekanik, yaitu seperti permukaan lempeng penyimpan data hardisk rusak secara fisik misal karena tergores, terkena debu, terkena benturan keras dan sebagainya. Sedangkan bad sector software bisa terjadi ketika hardisk sedang sibuk tiba-tiba mati, arus putus dan sebagainya.

Original from: http://www.tombolesc.com/2011/09/software-untuk-memperbaiki-harddisk.html
Copyright Astrominion Computer.

Software Untuk Memperbaiki Harddisk Yang Bad Sector | HDD Regenerator 1.71 Full Serial adalah sebuah software atau tools yang dapat kita manfaatkan untuk memperbaiki harddisk kamu yang kena bad sector. Nah, apa itu bad sector ? Bad Sector di hardisk secara umum ada 2 macam, yaitu mekanik/fisik dan software. Bad sector mekanik, yaitu seperti permukaan lempeng penyimpan data hardisk rusak secara fisik misal karena tergores, terkena debu, terkena benturan keras dan sebagainya. Sedangkan bad sector software bisa terjadi ketika hardisk sedang sibuk tiba-tiba mati, arus putus dan sebagainya.


Untuk Bad Sector yang berupa kerusakan fisik (mekanik), maka itu diluar pembahasan ini, karena hal itu biasanya tidak bisa (sangat sulit) diperbaiki. Jika masih ada garansi maka sebaiknya ditukarkan yang baru. Tetapi jika bad sector yang berupa software, maka kemungkinan masih bisa diperbaiki. Jadi pembahasan disini hanya berfokus bad sector secara software. 

HDD Regenerator 1.71 Full Serial ini mungkin dapat membantu kamu yang sedang mengalami masalah Harddisk yang bad sector ini, oleh karena itu tidak ada salahnya untuk mencoba software yang satu ini. Baiklah, langsung saja kamu download software HDD Regenerator 1.71 Full Serial dengan cara klik link ini Download HDD Regenerator 1.71 Full Serial

source:http://www.tombolesc.com/2011/09/software-untuk-memperbaiki-harddisk.html